Here I want to show you how I built my weather station in my gardenhouse.
Problem
- Weatherdata from the internet are often for a large region
- Dust: Official sensors are often far away
- Dist: Official sensor locations are sometimes not good placed
Target
- Fun
- Measured values at own location
- Own measure value post processing
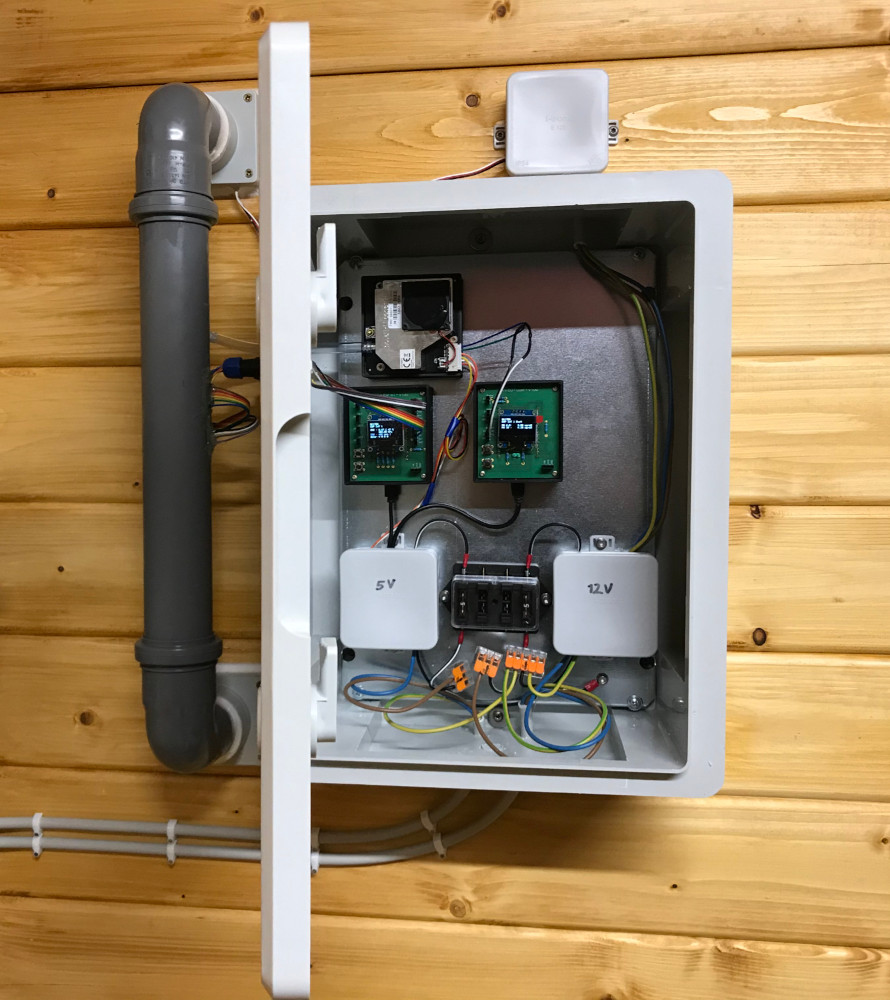
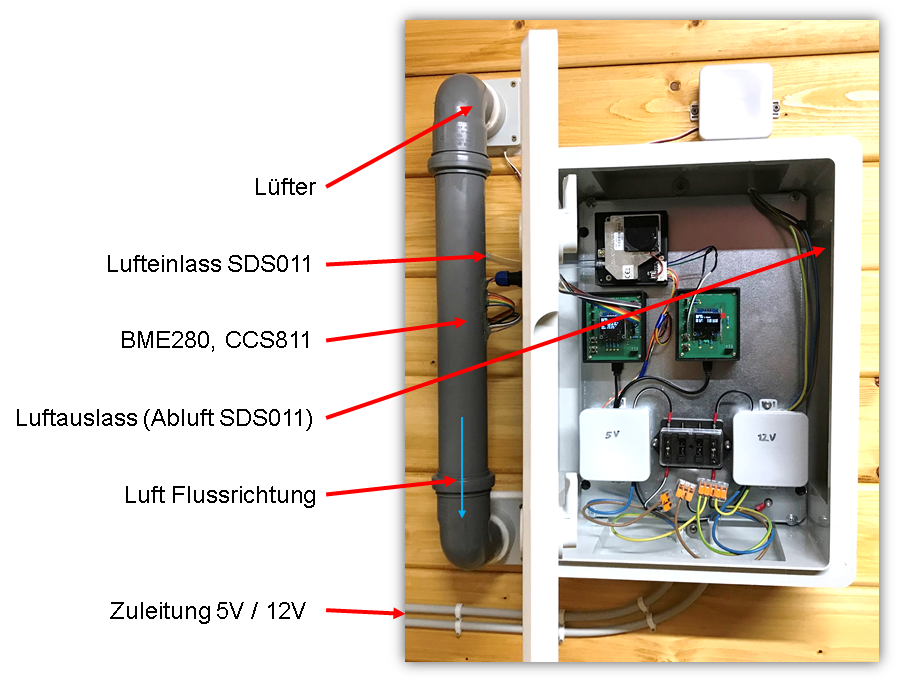
Hardware
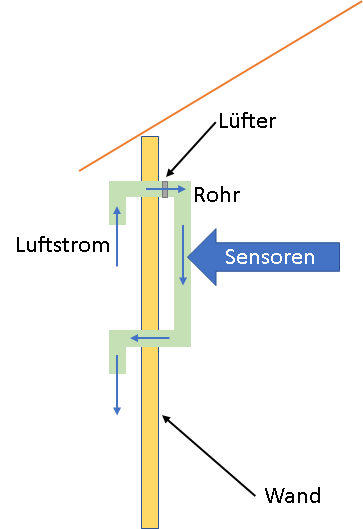
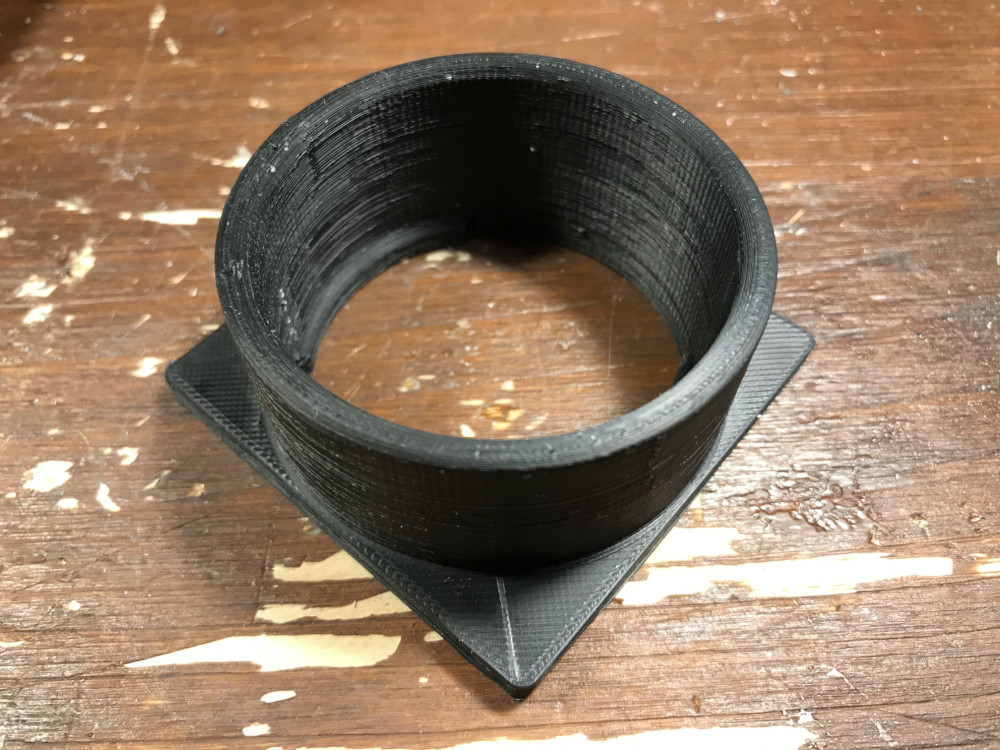
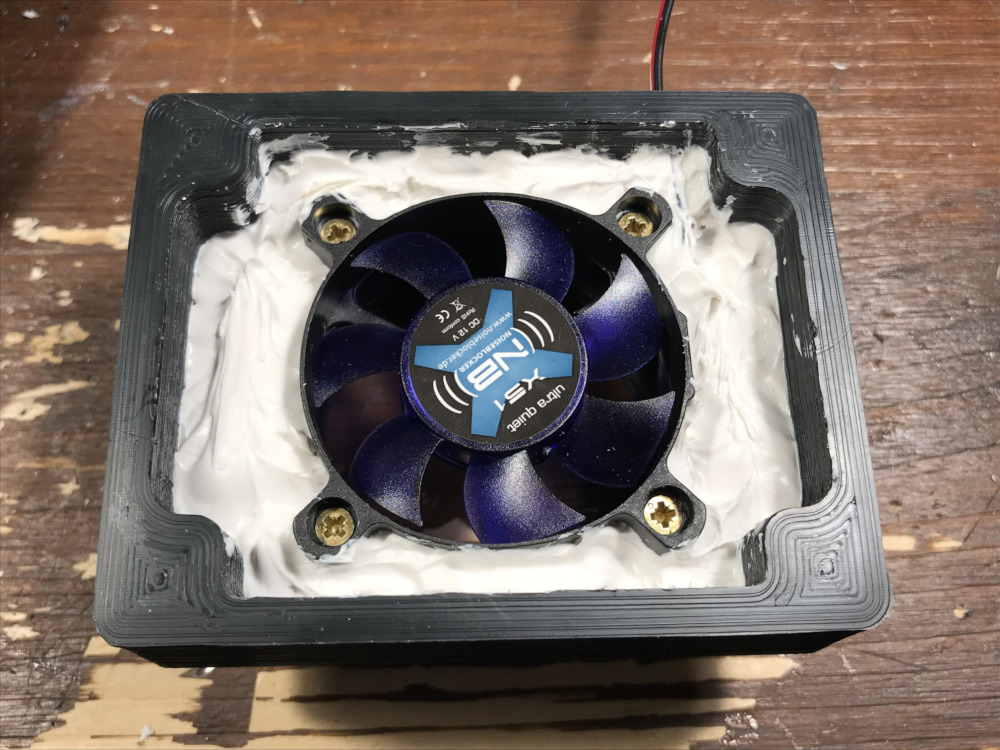
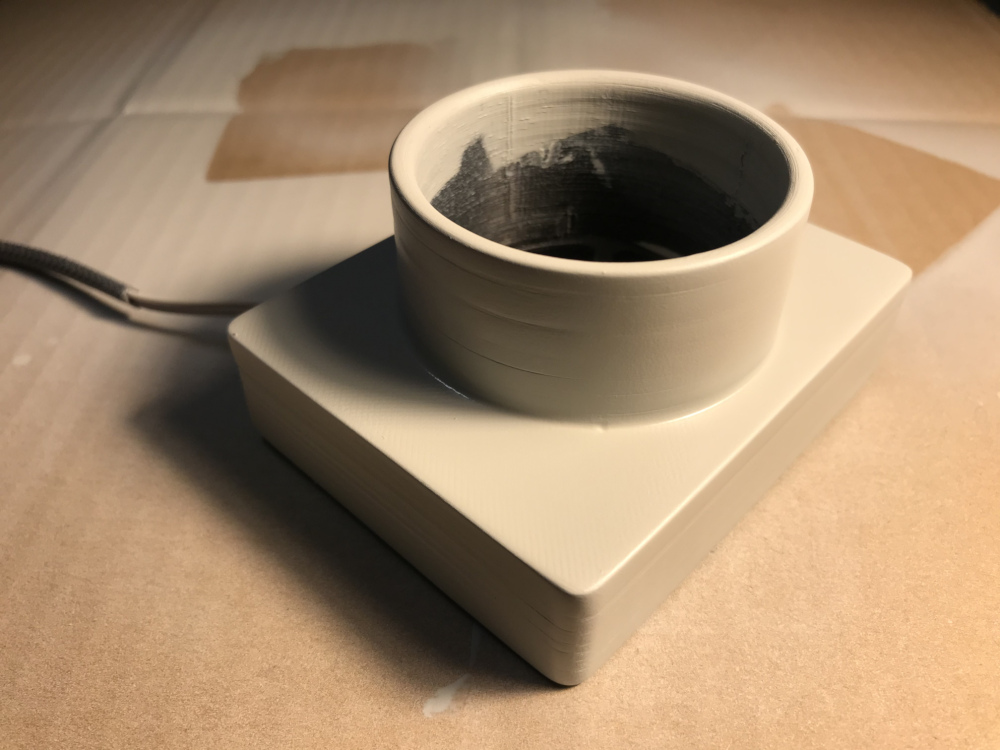
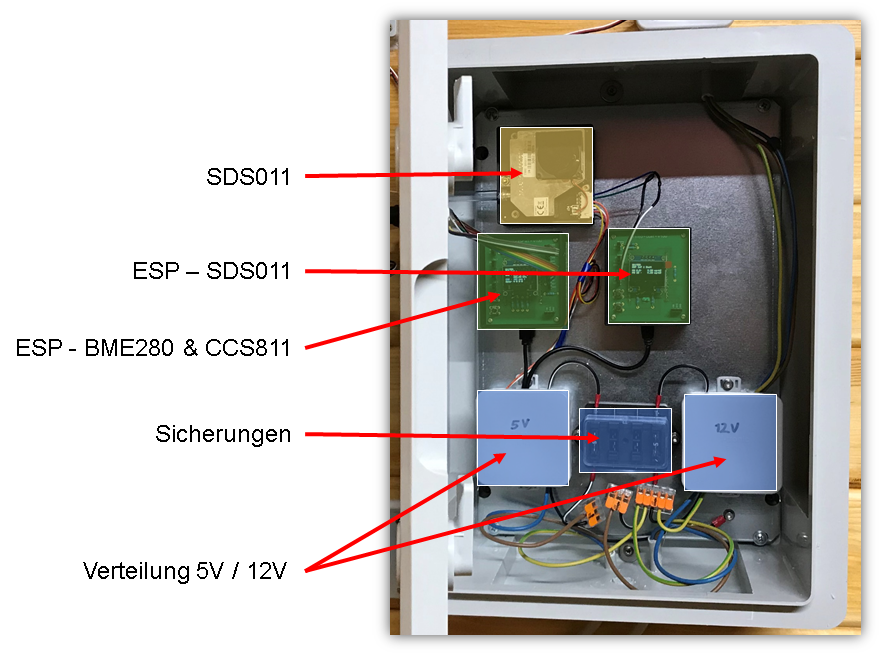
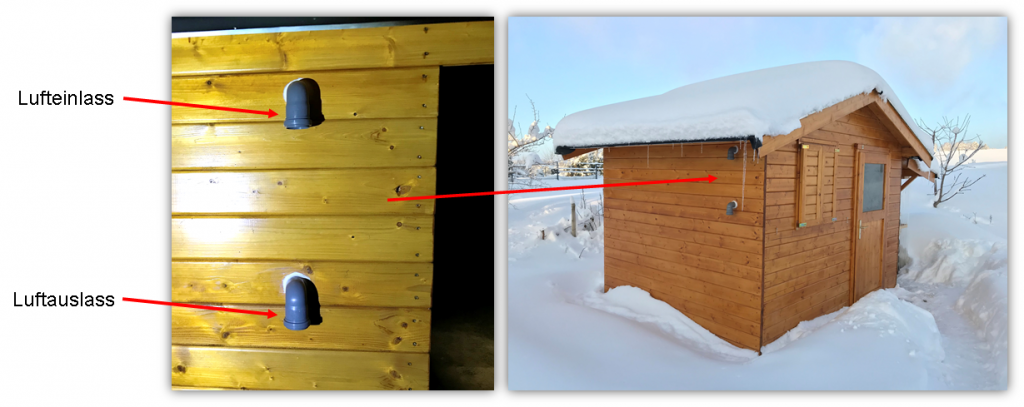
The red line is the roof, the yellow block is the wall. There will be installed some pipes and a fan to take the air in, which passes the sensors, then the air will be blowed out at the lower pipe.
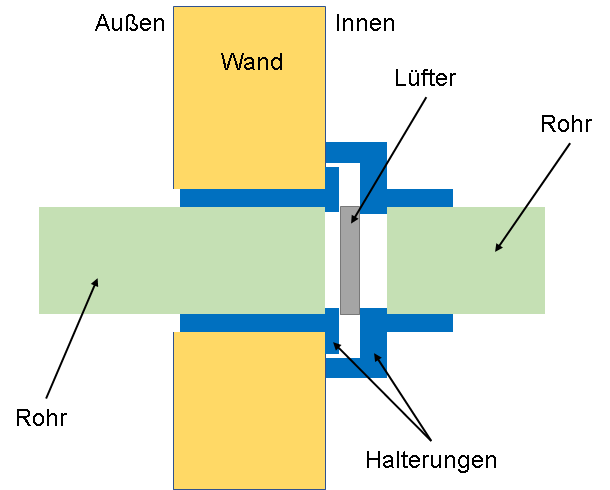
There will be installed two 3D printed parts in blue and also an intake fan to blow the air thru the pipes.
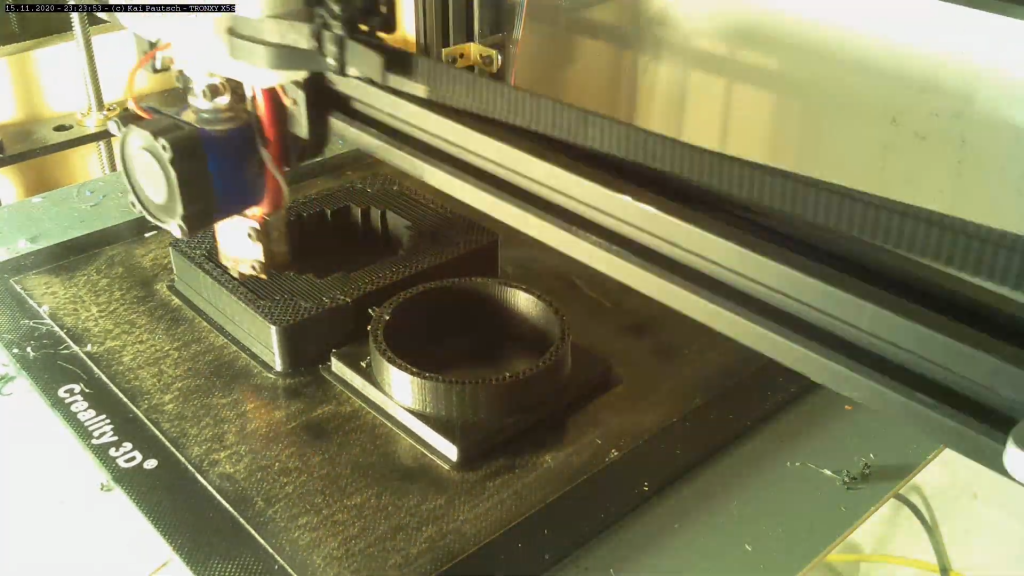
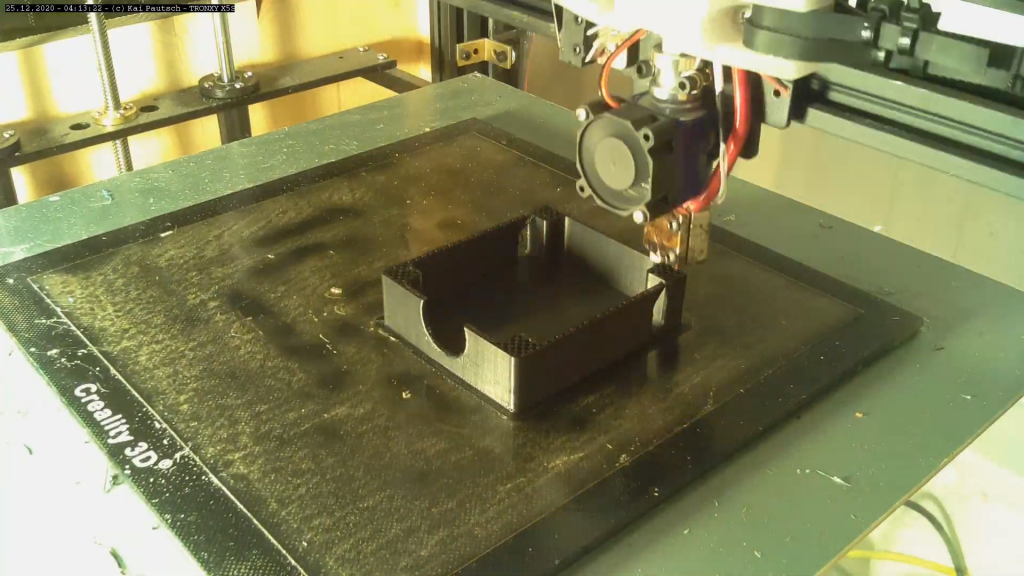
Parts – 3D Print

Components
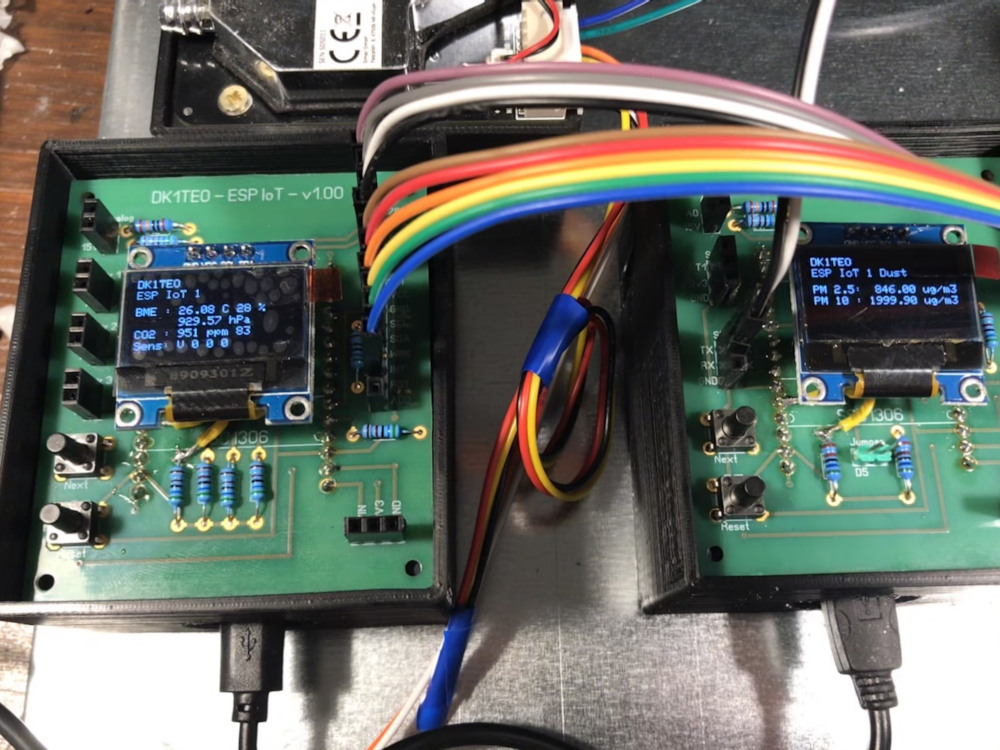
- ESP8266 NodeMCU
- BME280 for Temperature, Humidity and Pressure
- CCS811 for eCO2 and TVOC
- Nova SDS011 for Dust
PCB
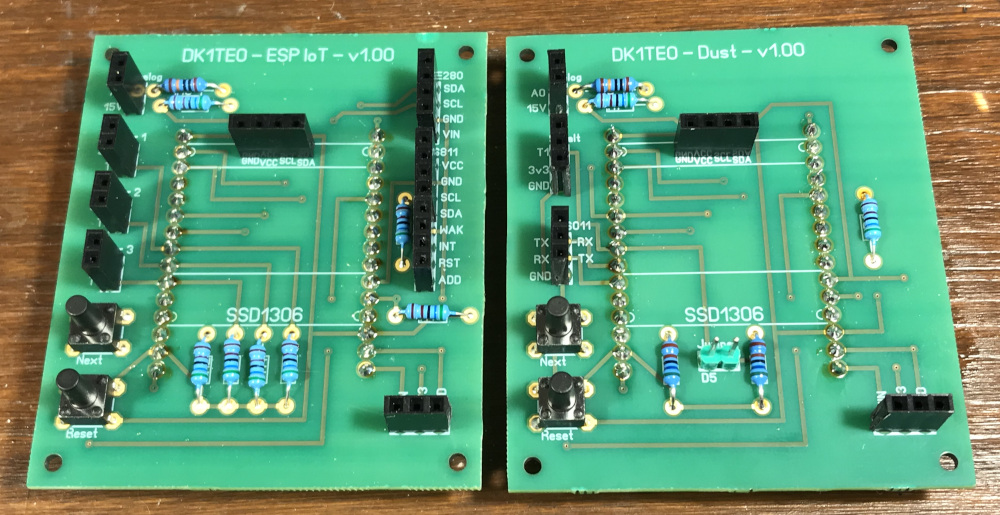
PCB for BME280 and CCS811 can be ordered from Aisler here
R6 = 100kO
R7 = 5.6kO
PCB for SDS011 dust sensor can be ordered from Aisler here
R6 = 100kO
R7 = 5.6kO
SDS011 should be powered externally.
All OTHER resistors should be between 4.7kO and 5.6kO.
A reset button and a “Next” button to e.g. enable the display when pressed can be used.
Both boards are deepsleep ready.
Setting
Software
Concept
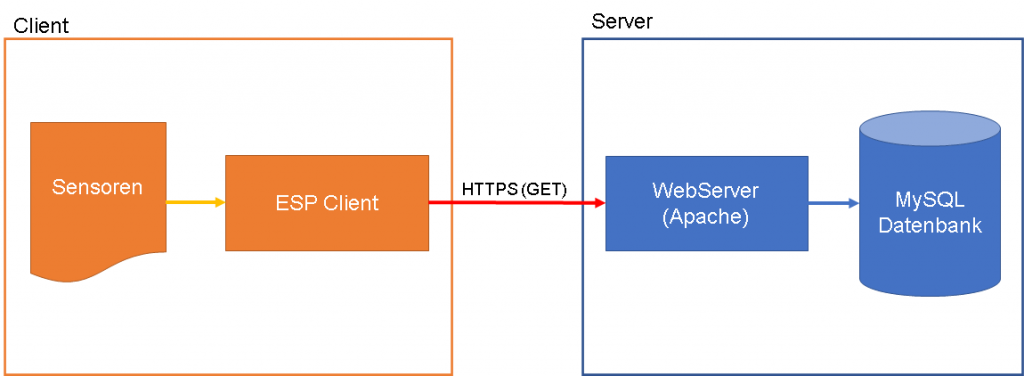
The problem is, that the ESP8266 does not know any SSL trusted certs. It is just possible to say “trust all, nothing, this one”. When the SSL-Cert is changed one time per year normally the ESP has to be reflashed one time per year.
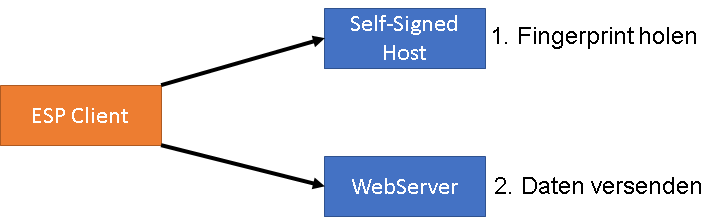
The solution is to have single host with a long term self signed certificate where the ESP requests the fingerprint for the real connection.
Development
I use the Arduino IDE with the following libraries:
- ESP_Adafruit_SSD1306 (Display)
- NTPClient (Uhrzeit/Datum)
- Adafruit_Sensor
- Adafruit_BME280 (Temperatur, Feuchtigkeit, Luftdruck)
- Adafruit_CCS811 (eCO2, TVOC)
- SdsDustSensor (SDS011)
- ESP8266HTTPClient, WiFiClientSecureBearSSL
- etc.
Code – Weather Sensors
This code is not usable, it is just a compilation of some snippets.
Inlcudes:
#include <Wire.h>
#include <ESP_Adafruit_SSD1306.h>

#include <ESP8266WiFi.h>

#include <ESP8266HTTPClient.h>
#include <WiFiClientSecureBearSSL.h>

#include <NTPClient.h>
#include <WiFiUdp.h>

#include <Adafruit_Sensor.h>
#include <Adafruit_BME280.h>

#include "Adafruit_CCS811.h"
I use multiple arrays to store the data:
String station[] {
  "ESP 1", // name 0
  "", // key 1
  "", // date 2
  "", // temp 3
  "", // hum 4
  "", // press 5
  "", // CO2 6
  "", // TVOC 7
  "", // Volt 1 8
  "", // Türkontakt 1 9
  "", // Türkontakt 2 10
  "", // Türkontakt 3 11
};

int valEnabled[] {
  1, // name 0
  1, // nothing 1
  1, // date 2
  1, // temp 3
  1, // hum 4
  1, // press 5
  1, // CO2 6
  1, // TVOC 7
  0, // Volt 1 8
  0, // Türkontakt 1 9
  0, // Türkontakt 2 10
  0, // Türkontakt 3 11
};

String valNames[] {
  "", // name 0
  "station", // key 1
  "", // date 2
  "TMP-1", // temp 3
  "HUM-1", // hum 4
  "PRES-1", // press 5
  "CO2-1", // CO2 6
  "TVOC-1", // TVOC 7
  "VOLT-1", // Volt 1 8
  "TUER-1", // Türkontakt 1 9
  "TUER-2", // Türkontakt 2 10
  "TUER-3", // Türkontakt 3 11
};
PIN definitions (important if you want to use the PCB):
const int nextButton = 15; // GPIO 15 - D8
const int tuer1Pin = 14;  // GPIO14 -  D5
const int tuer2Pin = 12;  // GPIO12 -  D6
const int tuer3Pin = 13;  // GPIO13 -  D7
// D1 SCL
// D2 SDA
Get sensor values:
void getVoltVal() // at the moment not needed for this usecase
{
  if (valEnabled[8] == 0)
  {
    return;
  }

  double analogVal = (double)analogRead(A0);
  double multiplikator = 58.20;
  double analogVolt = analogVal * (1.0 / 1023.0) * multiplikator;
  station[8] = String(analogVolt);
}

void getCcs811Vals()
{
  if (valEnabled[6] == 0)
  {
    return;
  }

  if(ccs.available())
  {
    if(!ccs.readData())
    {
      station[6] = String(ccs.geteCO2());
      station[7] = String(ccs.getTVOC());
    }
    else
    {
      Serial.println("ERROR!");
    }
  }
}

void getBme280Vals()
{
  if (valEnabled[3] == 0)
  {
    return;
  }

  station[3] = String(bme.readTemperature());
  station[4] = String(bme.readHumidity());
  station[5] = String(bme.readPressure() / 100.0F);
}
Send values via HTTPS:
void sendSingleVal(int valNumber)
{
  if (valEnabled[valNumber] == 1)
    {
      String curUrl = SendApiIotUrl + "?" + valNames[1] + "=" + station[1] + "&sensor=" + valNames[valNumber] + "&value=" + station[valNumber];
      Serial.println("url: " + curUrl);
      String completeRetVal = sendOneSensorVal(curUrl);
      Serial.println("payload: " + completeRetVal);
    }
}

String sendOneSensorVal(String urlIn)
{
  return webRequest(Fingerprint, urlIn);
}

String webRequest(const char *fingerprint, String URL)
{
  String retStr;

  WiFiClientSecure client;

  client.setFingerprint(fingerprint);

  HTTPClient https;

  //Serial.print("[HTTPS] begin...\n");

  if (https.begin(client, URL))
  {
    //Serial.print("[HTTPS] GET...\n");
    // start connection and send HTTP header
    int httpCode = https.GET();

    // httpCode will be negative on error
    if (httpCode > 0)
    {
      // HTTP header has been send and Server response header has been handled
      //Serial.printf("[HTTPS] GET... code: %d\n", httpCode);

      // file found at server
      if (httpCode == HTTP_CODE_OK || httpCode == HTTP_CODE_MOVED_PERMANENTLY)
      {
        String payload = https.getString();
        //Serial.println(payload);
        retStr = payload;
      }
    }
    else
    {
      Serial.printf("[HTTPS] GET... failed, error: %s\n", https.errorToString(httpCode).c_str());
      retStr = "error: ";
      retStr += https.errorToString(httpCode).c_str();
    }

    https.end();
  }
  else
  {
    Serial.printf("[HTTPS] Unable to connect\n");
    retStr = "ConErr";
  }

  //delete client;

  delay(50);

  return String(retStr);
}
The process how to get the fingerprint from the self signed page is not documented here but can be done by webRequest() function. The static fingerprint is saved in FingerprintSelfSignedCert, the dynamic downloaded fingerprint is saved in the same format but in the Fingerprint variable.
const char FingerprintSelfSignedCert[] = "XX:XX:XX:XX:XX:XX:XX:XX:XX:XX:XX:XX:XX:XX:XX:XX:XX:XX:XX:XX";
char Fingerprint[60];
Code – Dust Sensor
This code is not usable, it is just a compilation of some snippets.
Includes:
#include <Wire.h>
#include <ESP_Adafruit_SSD1306.h>

#include <ESP8266WiFi.h>

#include <ESP8266HTTPClient.h>
#include <WiFiClientSecureBearSSL.h>

#include <Arduino.h>
#include <SdsDustSensor.h>

#include <NTPClient.h>
#include <WiFiUdp.h>
I use multiple arrays to store the data:
String station[] {
  "ESP IoT 1 Dust", // name 0
  "", // key 1
  "", // date 2
  "", // Volt 3
  "", // Kontakt 4
  "", // PM2.5 5
  "", // PM10 6
};

int valEnabled[] {
  1, // name 0
  1, // nothing 1
  1, // date 2
  0, // Volt 3
  0, // Kontakt 1
  1, // PM2.5 5
  1, // PM10 6
};

String valNames[] {
  "", // name 0
  "station", // key 1
  "", // date 2
  "VOLT-1", // Volt 1 2
  "SCHALT", // Kontakt 4
  "PM-2-5", // PM2.5 5
  "PM-10", // PM10 6
};
PIN definitions (important if you want to use the PCB):
const int nextButton = 15; // GPIO 15 - D8
const int kontPin = 14;  // GPIO14 -  D5
const int rxSDS = 12; // GPIO12 - D6
const int txSDS = 13; // GPIO13 - D7
// D1 SCL
// D2 SDA
Get sensor values:
void getSds011Values()
{
  PmResult pm = sds.queryPm();
  if (pm.isOk())
  {
    Serial.print("PM2.5 = ");
    Serial.print(pm.pm25); // float, μg/m3
    station[5] = String(pm.pm25);
    Serial.print(", PM10 = ");
    Serial.println(pm.pm10);
    station[6] = String(pm.pm10);
  }
  else
  {
    Serial.print("Could not read values from sensor, reason: ");
    Serial.println(pm.statusToString());
    station[5] = "-1";
    station[6] = "-1";
  }
}
Send and fingerprint process works similar to the Weather Station one.
Data Quality
- General:
Value influences caused by environment circumstances (e.g. breathe out, bbq, walk by dust, heated surface by the sun) - SDS011 (dust):
Laser based sensor
Higher values by humidity or fog - CCS811 (eCO2, TVOC):
Sensor has to “burn in” for 48h before use
eCO2 is not CO2 !
Future
Ideas for the future are:
- Sensor: Wind direction
- Sensor: Wind speed
- Sensor: Garden house inner temperature
- Solarpanels with battery
Link
Sensor data is available online here.
An API is available by request to get the values from my weather station.
I don’t give a guarantee or assume any liability. If you build this, do it on your own risk and responsibility!